
From about serial number 900 until the end of Model T production in 1927 (1928 for the TT Truck) the transmission and clutch remained largely unchanged. Earlier Model T’s built in the 1909 model year prior to about serial number 900 had a different operating system that requires some different techniques. For the sake of clarity we will not address the earlier so called “two lever / two pedal” cars in this article.

The Model T uses three pedals and one lever to operate the parking brake, clutch, reverse speed, low speed, high speed, so – called “neutral” (more on this later) and foot operated brake.
Let’s look at a step – by – step procedure to adjust the brakes, bands, and clutch, while we explain the operation of each control. In order to achieve proper adjustment of each component it is important to first of all understand that they are inter – related. You must verify the adjustments in order if you want to have success. Adjusting components out of order will result in poor operation.
First adjustment to check and correct is the brake lever. The brake lever is attached to a cross shaft that has a clutch release cam welded and riveted to it.
First remove the two pins that connect the parking brake lever to the brake rods under the frame. With the pins removed you can make sure the brake lever has free movement all the way back to the seat and all the way forward.

Temporarily install the floor board to make sure the brake lever does not bind against the cutout in the floor or the metal trim around the cutout. Adjust the parking brake rod length so that the brake is firmly applied to both rear wheels with the brake lever about 2″ forward of the driver seat. The parking brake handle should not contact the driver seat. Next, with the parking brake rods connected, make sure that the parking brake handle moves all the way forward. Some reproduction floor boards are not made properly. It is sometimes necessary to elongate the slot in the wooden floor in order that the brake handle has full movement front / rear. Without proper movement in the brake handle all other operations will be affected and improper. When you are happy with the parking brake operation install new cotter pins at the brake rod clevis on both sides. Make sure the brake rod pivots have been oiled.

With the parking brake lever operating correctly, we next turn our attention to the band adjustments. In order that the band adjustment can be done properly, disconnect the link connecting the low pedal to the clutch release arm.

With the clutch disconnected from the low pedal we can adjust the low band properly. First remove the ignition key from the ignition switch to ensure that it cannot fall into the transmission when the access cover is removed. Remove the floor mat and the rear two floor boards. The forward most floor board needs to stay in place to be able to check our adjustments. We start by placing the brake lever halfway forward so that the transmission is in “neutral” and the parking brake is released.
To check low pedal engagement we push the pedal down to see if full engagement is achieved without touching the floor board.

To adjust the low band we first must loosen the lock nut on the low band adjuster.

Then the center adjuster can be tightened which raises the pedal. Do not adjust this any tighter than necessary to allow the low pedal to firmly engage just above the floor mat. If the band is adjusted too tight it can cause loss of power, creep in neutral, and overheating. It can also cause severe transmission damage, rapid wear of the band, or a cracked drum.

After adjustment the lock nut is turned clockwise until it is tight. The low pedal travel is again checked to make sure that the pedal can be fully depressed and still barely clear the floor board.

Next we remove the transmission cover to be able to adjust the brake and reverse bands. In our cars we always use an accessory transmission screen. This particular unit was made by Bergs. Similar screens are available from any of the Model T part suppliers, both original and reproductions. notice this one has a tablespoon of debris and dirt in it, showing that it is doing its job.

We remove the screen to expose the transmission. The forward band is Reverse. The center band is Low. The rear band is the Brake.

Again, as we did with the low pedal, we check the brake pedal travel and make sure it clears the floor board when fully depressed. This particular car has accessory outside brakes. We disconnect the link from the brake pedal connecting the accessory brakes in order to make sure there is no interference caused by that connection.

The brake pedal checks good, it does not need adjustment. If adjustment were necessary an 11/16″ open end wrench is used to turn the adjuster nut. The nut has a notch every 180 degrees that locks it in place. In other words you can adjust it in 1/2 turn increments, it will not stay in place except at those notches.
The reverse pedal is a bit different. It is about 3″ above the floor board when fully depressed if the adjustment is correct. This is because the reverse pedal is intentionally placed to the rear of the other two pedals, which makes it possible for folks like me with size 14 feet to be able to drive a Model T.

The reverse pedal adjustment requires a special technique to turn the nut on the band adjuster. You push the pedal to the floor, insert the wrench and release the pedal. This turns the nut about 1 flat. To turn the nut 1/2 turn tighter will require three repeats of the above. In our case 1/2 turn tighter resulted in a good solid reverse pedal. Note that you can’t really measure from the floor board to adjust the reverse pedal. These cars are 90 – 100+ years old. The parts are often worn, bent, poorly made reproductions, or all three. You will have to drive the car and through trial and error you will find the right adjustment.
Again it needs to be said that the least amount of adjustment that results in proper action is what you want. If the reverse band is too tight it will result in a hard to start engine, overheating, rapid band wear, and even transmission damage or drum cracks.
Let’s look at clutch adjustment and “neutral”.
In the Model T Ford there is not truly a “neutral”. What we have is a condition where the car can have a running engine, but the car is stationary. What is allowing this is the clutch being released. There are two ways to release the clutch on a Model T Ford when all is adjusted properly. The first way is to pull the parking brake lever back. Moving the brake lever back 1/2 way will place the transmission in “neutral”, i.e. the clutch is disengaged, yet the low pedal and reverse pedal can be used to move the car forward or to back up.
The second way to release the clutch is to press the low pedal. When driving in low the clutch must be released, otherwise the engine would stall because the transmission would be trying to tear itself apart, being engaged in both direct drive (“high gear”) and low at the same time. Most T drivers depress the low pedal half way when reversing or braking, or when stopped at a red light.
The clutch in a Model T Ford is actuated by a large spring. It is a good idea to always replace this spring any time the engine and transmission are out of the car for other maintenance. The spring can be changed with the engine in the car, but this is an expert level procedure, not something you can do without special tools and above average mechanical skills.

There are two main adjustments for the clutch engagement. One is the link between the clutch (low) pedal and the clutch actuator arm. The other is the bolt mounted to the clutch actuator arm that is moved by the parking brake lever cam.
![]()
The drawing above gives you the basic procedure, but more words describing it will simplify the understanding for the first timer.
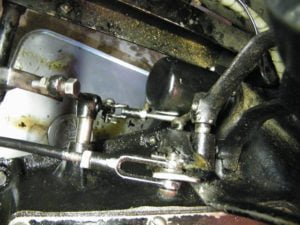
The parking brake lever is placed all the way forward. The link between the low pedal and the clutch release arm is disconnected, allowing the clevis to be adjusted. Pull rearward on the low pedal, and adjust the clevis so that the hole just aligns.

Sometimes because of wear, poorly made reproduction parts, and a mixture of different model year components it is necessary to make a longer link to be able to achieve the proper clutch release. We regularly have to make these links from a hardware store grade 5 bolt. We cut off the bolt head, make a bend in the bolt, drill a hole for a cotter pin, and it is ready to go. The one shown is about 1/2″ longer than the Ford original next to it.

The final adjustment for the clutch is the bolt which changes the relationship between the clutch release arm and the brake lever clutch cam. This bolt can be shortened which releases the clutch less, or lengthened to increase the amount of clutch arm movement. It should be adjusted so that the clutch pedal moves forward about 1/2 way when the parking brake lever is pulled back.

In many cases the bolt has worn down over the years, or the other parts are worn out, or misassembled, or a mixture of various year Model T parts. In these cases it is sometimes necessary to make a longer or shorter bolt.
There is one other adjustment for the clutch. It is normally only adjusted when the engine / transmission are apart for heavy repair or maintenance. It is only adjusted if satisfactory adjustment is not achievable using the other two adjustment points.
The clutch spring presses against a collar which rides on three arms that pivot on the clutch hub. These three arms each have an adjuster screw. Each of the adjuster screws is normally secured by a cotter pin. The Ford factory shop manual tells you to adjust the clutch to have 13/16″ clearance when rebuilding the transmission. See the photo below, the dimension needs to be checked at each lever location so that they are absolutely identical. If the dimensions are not identical the clutch spring pressure is applied unevenly resulting in clutch slippage. This is normally never adjusted after engine / transmission assembly. If you are adjusting this in the car, you need to be very careful to maintain the relationship between all three screws.

The photo below shows the clutch tension screw location in the car with the transmission door removed.

Any time these screws need to be adjusted in the car it should be a warning that something is terribly wrong. Double and triple check all the other adjustments before you attempt to adjust the clutch here. If adjustment is needed here, it is often because the car has an aftermarket clutch that uses a fiber clutch material. The Ford clutch plates are all steel and are very trouble free, never requiring adjustment in service. The need to adjust these screws is usually an indication that an aftermarket clutch pack is going south. Incorrect adjustments here can hasten the demise of an aftermarket clutch, or temporarily make it serviceable.
The clutch adjustment screws are adjusted 1/2 turn at a time. You first carefully remove all three cotter pins, tying each with dental floss or safety wire prior to removal. You will have to rotate the engine 1/3 turn to access each cotter pin. After the cotter pins are removed each screw is adjusted 1/2 turn and the new cotter pin installed before rotating to the next adjuster. This way makes it nearly impossible to over or under adjust any of the screws.
Let’s look at a troubleshooting grid in case you still have problems after systematically adjusting as per all of the above.
Problem 1 – engine over speeds when shifting into high gear
Possible solutions for Problem 1 – Brake lever is not moving all the way forward or clutch not adjusted properly. Check the slot in the floor board for misplacement. Brake rods too short or too long. (they may have been cut off by a previous mechanic). Aftermarket clutch is worn out. Clutch spring worn out.
Problem 2 – poor engagement of brake pedal, low pedal or reverse pedal
Possible solutions for Problem 2 – Worn bands need replacement. Band Adjustment. Bent pedals. Worn out linkage or cams on the pedal shafts. Drums turned down too small by a previous mechanic.
Problem 3 – Car has poor “neutral”, creeps in neutral, hard to turn engine over with hand crank
Possible solutions for Problem 3 – Engine oil is improper for the ambient operating temperatures (too thick). Clutch adjustment incorrect. Worn parts need to be replaced. Improperly made reproduction parts will not allow proper adjustment.
The last thing that you need to do is test drive the car. Often the proper band adjustment or clutch adjustment is just a wrench turn away from perfect. With practice you will figure it out. The secret is only adjusting in small increments, until you are satisfied.