Alignment is critical to control of the car. It also is a big factor in tire wear. Obviously having tires that are the same brand and size might also help! In the depths of the great depression a person might have to decide between buying food or tires. The photo above shows the result.
With several Model T’s in the garage we get to drive a different one often enough to be able to compare them to each other. I started noticing “hmmm the ’15 doesn’t drive as nice as the other ones.” It was sort of squirrelly at higher speeds. It seemed to dart one way or the other on bumpy roads. Something wasn’t right. I thought about putting the car together about 25 years ago, and couldn’t recall ever checking the alignment. Maybe I never had? With that thought I started researching what the various Model T manuals around here said in order to make a decent job of it.
Caster is adjusted by bending the wishbone. The Model T Part vendors sell a tool for this that is big and heavy. Fortunately this was not my problem!
The front end has several bushings at the steering pivot points and bearings on the wheels. All these things need to be in good condition, greased or oiled properly, and in the case of the wheel bearings, adjusted properly.
A bent or twisted axle is best evaluated off the car as shown in this drawing from the Ford shop manual. This is tough to repair if yours is bad. Generally the best thing that you can do is look for a better axle. Straightening one is not something that you would want to do.
Spring perches are left or right “handed” and are what generally sets the proper caster. Looking at the rear of the perches you can see a radius in the hole which matches the radius on the wishbone.Looking at the front of spring perches, the holes for the wishbone are not radiused and have a sharp edge.The camber of the wheels is dependent on having a straight axle and good spindles. If the spindles or axle are bent then abnormal tire wear and poor handling characteristics can be expected. It’s easy to measure, you just need a tape measure. Thank goodness this wasn’t my problem! Bent spindles must be replaced.
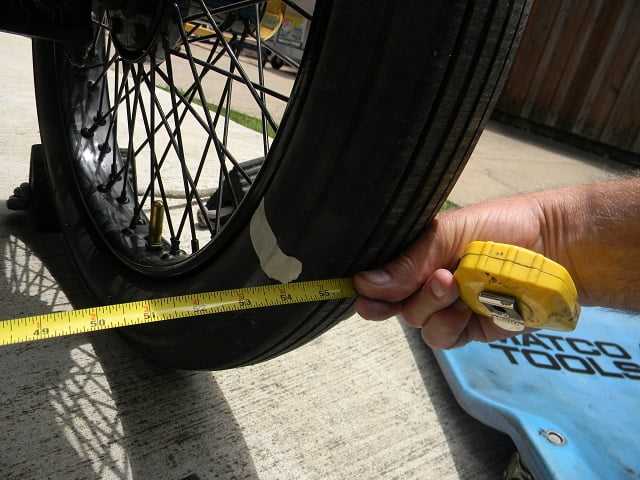
Since I couldn’t recall ever checking the toe in on the ’15 previously I decided that was going to be the task for the day. It’s easy to do if you know how. You need a bit of masking tape, a carpenter’s framing square, and a tape measure to check toe in on your Model T.
The car needs to be on a relatively level surface with room to move the car forward and rearward a few feet.
Here is what the factory setting is for toe – in on all Model T’s.Using the framing square I measure 10″ off the ground and stick a piece of masking tape on the tire intersecting a character line on the tire. The tape is placed so it is relatively parallel to the concrete.I do the same thing on the LH front tire.The tape measure is used to measure between the two spots on the tires.It measured right at 54″.Next, release the parking brake and roll the car backwards until the top of the tape is at 10″ as it was when the tape was on the rear of the axle. This establishes the measurement point in front of the axle. Because the wheel has been rotated it compensates for any kind of defect in the wheel, tire or rim. I am using a set of rubber wheel chocks to stop the car where it measures correctly in order to avoid using the parking brake. Take a look at the red arrow – see what’s missing?The RH wheel is checked and it is also at the proper 10″ above the pavement. We measure the distance using the tape measure between the two reference points.It’s hard to measure and take pictures at the same time. In any case the dimension I found was 54 1/2″. Instead of toe in, I had toe out! No wonder the car was squirrelly.On pre – 1921 Model T’s the steering rod is adjusted on the LH side. You must remove the bolt from the tie rod that connects it to the steering arm (yellow arrow). The clamp bolt must be loosened (green arrow).To get more toe in the tie rod is lengthened. We spent a bit of time lengthening, reinstalling the tie rod bolt, measuring toe in, and then trying again, until we got to the point where the toe in was 1/4″ less at the front than at the rear.The tie rod has threads that are easily damaged by overzealous tightening of the tie rod bolts. The bolt should be tightened finger tight until it bottoms out. Then turn it one wrench flat further with a wrench. After that the nut is installed finger tight until it bottoms. The nut is advanced further using a wrench until the cotter pin can be installed. Excessive tightening can ruin the parts.The clamp nut is tightened and new cotter pins are installed.During the job we wiped everything off to remove the grease and oil, making it easier to handle the camera and the wrenches. Now I oiled all the oilers.The spring perch nuts didn’t have cotter pins for some reason. The LH one (shown) was tight so it just needed a cotter pin. The RH one the nut was loose! It was tightened about 1 1/2 turns and a cotter pin installed there too.
We spent about half a day checking, adjusting and lubing the front end. After all that work we were pretty greasy so a change of clothes followed a good cleanup.
Driving was vastly improved!
With the alignment now set properly the car is transformed! It is much easier to drive. The car no longer darts from side to side on bumpy roads. It wants to cruise at higher speeds. Our confidence level is improved. This was a job that took a few hours but cost only the price of a couple cotter pins.