After WWI the British introduced these nifty Model T vans. We wonder why this body style never came to the USA – it would have been popular. From a British advertisement, about 1924.
Our 1917 runabout has served us well on several tours in the past few years. It is smooth and reliable. Still, we wished that it had a bit more power on some of the steeper hills. This edition we find out the easiest way to get more horsepower and torque from any Model T Ford. We install an aluminum high compression cylinder head.
Our Model T has no other modifications to the engine. This is a low mileage car, with just about 5000 miles since new. It was painted metallic green in the 1950’s, and received aluminum pistons in 2004. It is standard bore, and has the original camshaft. I am the third owner, my father was the second owner.
The instructions and photos here can also be used to guide the replacement of the head gasket for any Model T with any sort of cylinder head. If you have a cast iron head then any of the available head gaskets will work fine. My preference would be for the one that is cheapest.
Our replacement cylinder head was purchased used. It had severe corrosion on the deck surface around the water passages because someone used plain water as a coolant. We had the corroded areas milled out and MIG welded, then the entire head was surface ground to make it flat. Last the passageways were ground to their original shape with rotary files, and we tapped the holes where the water outlet attaches.
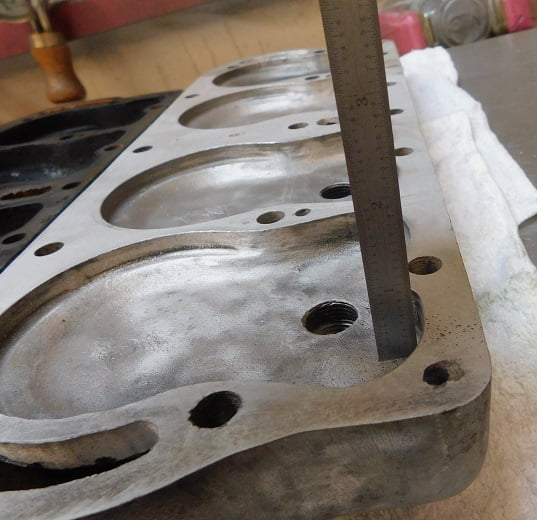
The hood came off first thing so we would have easy access. We took cylinder cold cranking pressure readings before and after the job. Readings on all four were right at 45 PSI with the original head in place.We didn’t drain all the coolant, just enough to get the coolant level below the head. We filled two of these galvanized EZ Pour pans half full.The two bolts at the rear of the cylinder head are directly under the firewall. In order to be able to remove the steel firewall shield we had to remove the coil box. More on this later. We removed all the head bolts and pulled the head off.The old cast iron low head on the bench next to the new aluminum head. We thought it might be interesting to measure the combustion chamber at the edges to compare. The new one measures about 3/8″ deep on the driver side.The original head measured over 3/4″ in the same spot.The iron head measured about 1 1/8″ on the passenger side.Our aluminum high compression head measured a little over 3/4″ at the same point.We scraped all the carbon off the pistons and valves, then used a powerful shop vacuum to remove the debris. After that we used a 7/16″ – 14 bottoming tap to chase the threads in all the head bolt holes. A 5/16″ square drive socket makes this an easy job using the ratchet.You need to take several precautionary steps when installing an unknown cylinder head on any engine. Here we have the head installed with no head gasket. Two head bolts are installed at opposite ends and sides of the engine. With the head laying on the block we slowly pull the crank many times to rotate the engine several times. You want to be 100% positive that there is no contact between the pistons or valves with the new cylinder head before proceeding. Good news – we didn’t have any problems.Next we installed all the bolts and ran them down using a 1/4″ air ratchet. Most of them bottomed out before coming flush with the cylinder head, which we expected. The worst one was 3/16″ away from being flush.
When installing an aluminum cylinder head there are some general rules that need to be followed if you are going to be successful. First of all, there needs to be a washer under every head bolt to keep the head from being damaged every time the bolt is rotated. Second, the length of the bolts is invariably shorter than it was before, so you need to make sure the bolts that you install are the proper length. Third, aluminum rots away quickly in the presence of pure water. Make sure that you have an appropriate mix of ethylene glycol and water. Fourth, aluminum and copper head gaskets are not compatible, nor are aluminum and graphite head gaskets. It is always best to use a steel or composition head gasket with an aluminum cylinder head.
Bare aluminum corrodes easily so we masked off the spark plugs and water inlet hole, then painted ours black.We cut off all of the head bolts to the shortest length needed by the worst fitting one. Overall length was shorter by .187″ when we finished. We used a cutoff wheel in a high speed angle motor, then beveled the end of all the bolts with the grinder. Finally we ran a 7/16″ – 14 die over each one to make sure the threads were clean. Finally we ran a 7/16″ – 14 die over each one to make sure the threads were clean. This was the most time consuming part of the entire job.We cleaned the deck surfaces thoroughly with a piece of Scotchbrite, then vacuumed the block again. We wiped the head gasket surfaces down with lacquer thinner several times to make sure it was clean and free of any oil or grease. The steel / asbestos head gasket was hung by a wire and sprayed on both sides with Permatex copper gasket sealant. Then the gasket was laid on the block with the larger water jacket hole to the rear as shown.
Here’s a link to the Langs head gasket that we used: https://www.modeltford.com/item/3002A.aspx
Cylinder heads need to be torqued from the center out as shown in this 1923 Dykes illustration.I don’t typically use a torque wrench anywhere on a Model T. The aluminum cylinder head made me think it might be warranted. We torqued all the head bolts to 45 Ft- LB.
The water neck got a new gasket too.The firewall shield has one hole that is covered by the coil box. To avoid having to remove the coil box every time we wanted to remove the dash shield we slotted this one hole, and only tightened the screw enough to allow the dash shield to easily be slipped out or in later on. Then we installed the coil box.After the head has been re – torqued we will paint all the head bolts and washers. For now everything has to be installed and hooked up so the engine can be brought up to operating temperature.It pays to double check that the petcock is closed before pouring the coolant back in. We used a smaller pan to pour the coolant into the radiator, the great big ones are heavy even when half full.We ran the engine for about 10 minutes, just enough to bring it up to operating temperature. Then we called it a night.
Today we started by re – torqueing all the head bolts. It was shocking how loose some of them were now that the engine had cooled. A compression test revealed the new cold cranking pressure was 60 PSI in all four cylinders, markedly up from the 45 PSI readings taken before the high compression head had been installed.
After that, we reinstalled the dash shield, plugs, and floor boards for a quick drive around the neighborhood. Power was much improved. The car is easier to drive than before, first gear does not need to be “wound out” as high as before. While it is probably capable of a higher top speed, we won’t be driving it any faster because, after all, it’s still a Model T. The steering and brakes are not adequate above typical Model T speeds. We expect this extra power will be very handy when climbing hills on the next tour.